
Strapi is a most advanced open source content management system (CMS) designed to help developers to build powerful API.
Strapi follows a “headless” architecture, which means it separates the content management backend from the frontend presentation, giving developers the freedom to use various technologies and frameworks on the frontend.
In this tutorial, we will show you how to install Strapi on Debian 12 OS.
Step 1: Update Operating System
Update your Debian 12 operating system to make sure all existing packages are up to date:
# apt update && apt upgradeStep 2: Install Nginx webserver
You can install Nginx via apt package manager by executing the following command.
# apt install nginxYou can start the Nginx service and configure it to run on startup by entering the following commands:
# systemctl start nginx
# systemctl enable nginx
Verify the status of the Nginx service using systemctl status command:
# systemctl status nginxOutput:
● nginx.service - A high performance web server and a reverse proxy server
     Loaded: loaded (/lib/systemd/system/nginx.service; enabled; preset: enabled)
     Active: active (running)
       Docs: man:nginx(8)
    Process: 627 ExecStartPre=/usr/sbin/nginx -t -q -g daemon on; master_process on; (code=exited, status=0/SUCCESS)
    Process: 646 ExecStart=/usr/sbin/nginx -g daemon on; master_process on; (code=exited, status=0/SUCCESS)
   Main PID: 655 (nginx)
      Tasks: 2 (limit: 2273)
     Memory: 3.8M
        CPU: 27ms
     CGroup: /system.slice/nginx.service
             ├─655 "nginx: master process /usr/sbin/nginx -g daemon on; master_process on;"
             └─656 "nginx: worker process"
Step 3: Install Node.js
Strapi is based on Node.js, for that reason, you need to have Node.js installed on your server.
To install Node.js and npm on your Debian OS use the following command:
# apt install nodejs npmYou can verify the Node.js version with the following command:
# node --versionYou should see the following output:
v18.13.0Also, verify the npm version with the following command:
# npm --versionYou should get the following output:
9.2.0Step 4: Install PostgreSQL
Strapi uses PostgreSQL as a database backend, so you will need to install PostgreSQL on your server.
You can run the following command to install the PostgreSQL server:
# apt-get install postgresql-15After the successful installation, start the PostgreSQL service and enable it to start after the system reboot:
# systemctl start postgresql
# systemctl enable postgresql
Verify that is active and running on your server:
# systemctl status postgresqlOutput
● postgresql.service - PostgreSQL RDBMS
Loaded: loaded (/lib/systemd/system/postgresql.service; enabled; preset: enabled)
Active: active (exited)
Main PID: 13153 (code=exited, status=0/SUCCESS)
CPU: 1ms
Next, connect to the PostgreSQL shell:
# su postgres
# psql
Then, we create the Strapi database:
postgres=# CREATE DATABASE strapidb;
postgres=# CREATE USER strapi WITH PASSWORD 'Your-Strong-Password';
postgres=# GRANT ALL PRIVILEGES ON DATABASE strapidb to strapi;
postgres=# \q
Return to your root user account.
# exitStep 5: Create a Strapi Application
Once PostgreSQL and Node.js have been installed, we can proceed to install Strapi.
You can use the npx command line utility to easily create a Strapi app.
# cd /opt
# npx create-strapi-app@latest strapi --no-run
You will see the following output.
Need to install the following packages:
  create-strapi-app@4.12.1
Ok to proceed? (y) y
Proceed with the creation by pressing y.
In the interactive shell, select custom installation then your database client, database name and user name as provisioned.
? Choose your installation type Custom (manual settings)
? Choose your preferred language JavaScript
? Choose your default database client postgres
? Database name: strapidb
? Host: 127.0.0.1
? Port: 5432
? Username: strapi
? Password: ********************
? Enable SSL connection: No
Next, navigate to the strapi directory and build the application with the following command.
# cd strapi
# npm run build
Output:
> strapi@0.1.0 build
> strapi build

Building your admin UI with development configuration...

✔ Webpack
  Compiled successfully in 1.12m

Admin UI built successfully
Then run Strapi in development mode.
# npm run developIf everything is fine, you will get the following output.
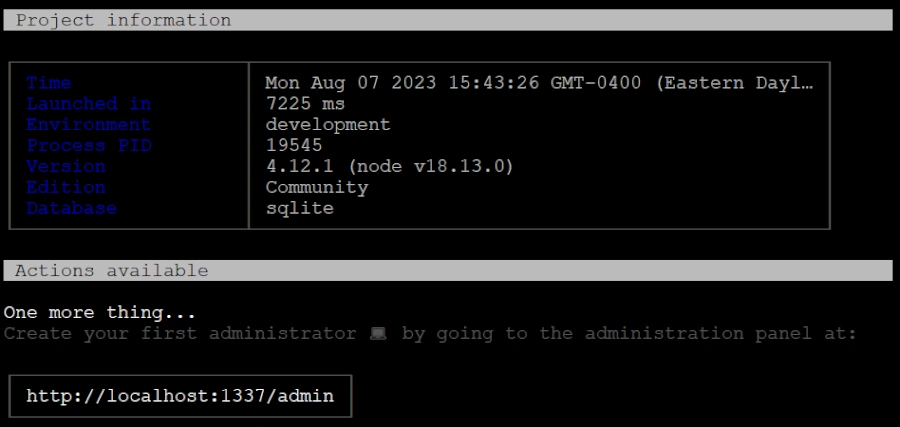
Press the CTRL+C to stop the application.
Step 6: Run Strapi with PM2
In this step we will describe you to how to run Strapi app with PM2 command. PM2 is a Production Process Manager for Node.js applications.
First, install PM2 application by running the following command:
# npm install pm2@latest -gNow create a pm2 ecosystem file which is where you can setup some environment variables for each pm2 app you want to install and run.
# nano /root/ecosystem.config.js
Paste the following content in the file.
module.exports = {
  apps: [
    {
      name: 'strapi',
      cwd: '/opt/strapi',
      script: 'npm',
      args: 'start',
      env: {
        NODE_ENV: 'production',
        DATABASE_HOST: 'localhost',
        DATABASE_PORT: '5432',
        DATABASE_NAME: 'strapidb',
        DATABASE_USERNAME: 'strapi',
        DATABASE_PASSWORD: 'Your-Strong-Password'
      },
    },
  ]
};
Note: /opt/strapi is the path to your project, you are required to replace this with your own path before you proceed.
Once modified, save the file then start the app in the background with the command:
# pm2 start /root/ecosystem.config.jsYou can see that the status of the app is set to online.
# pm2 list
To allow the app to start automatically on boot, use the command:
# pm2 startup -u rootSave the process:
# pm2 saveYour Strapi service is now running in the background in production mode.
Step 7: Configure Nginx for Strapi
Create a new Nginx virtual host configuration file.
# nano /etc/nginx/conf.d/strapi.confAdd the following configurations:
upstream strapi {
server 127.0.0.1:1337;
}

server {

listen 80;
server_name your-domain.com www.your-domain.com;

location / {
        proxy_pass http://strapi;
        proxy_http_version 1.1;
        proxy_set_header X-Forwarded-Host $host;
        proxy_set_header X-Forwarded-Server $host;
        proxy_set_header X-Real-IP $remote_addr;
        proxy_set_header X-Forwarded-For $proxy_add_x_forwarded_for;
        proxy_set_header X-Forwarded-Proto $scheme;
        proxy_set_header Host $http_host;
        proxy_set_header Upgrade $http_upgrade;
        proxy_set_header Connection "Upgrade";
        proxy_pass_request_headers on;
      }
}
Save and close the file, then edit the Nginx main configuration file.
# nano /etc/nginx/nginx.confAdd the following line after the line http{: but before the line include /etc/nginx/conf.d/*.conf;.
server_names_hash_bucket_size 64;Save the file, then verify the Nginx configuration.
# /usr/sbin/nginx -tYou should see the following output:
nginx: the configuration file /etc/nginx/nginx.conf syntax is ok
nginx: configuration file /etc/nginx/nginx.conf test is successful
Restart the Nginx service to implement the changes.
# systemctl restart nginxStep 8: Access Strapi Web Interface
Now, open your web browser and access the Strapi web UI using the URL http://your-domain.com/admin. You should see the Strapi default page:

Then click on the Let’s start button. You should see the Strapi dashboard:

Comments and Conclusion
Congratulations. You have learned how to install Strapi on Debian 12 OS. You can now create your own application easily using Strapi.
For additional help or useful information, we recommend you to check the official Strapi documentation.
With PG 15 -> ALTER DATABASE strapidb OWNER TO strapi;
If not you will have an privileges error un npm run develop when creating tables