
AWStats (Advanced Web Statistics) is an open-source web analytics tool that analyzes and generates comprehensive reports about web server log files. It provides detailed information about various aspects of web traffic and visitor behavior on a website.
It’s important to note that AWStats relies on server log files, so it may not provide real-time data and requires proper configuration to work effectively.
In this tutorial, we will show you how to install AWStats on Debian 12 OS.
Step 1: Update Operating System
Update your Debian 12 operating system to the latest version with the following command:
# apt update && apt upgradeStep 2: Install Apache webserver
You can install it via apt package manager by executing the following command.
# apt install apache2Verify the status of the Apache service using systemctl status command:
# systemctl status apache2Output:
● apache2.service - The Apache HTTP Server
     Loaded: loaded (/lib/systemd/system/apache2.service; enabled; preset: enabled)
     Active: active (running)
       Docs: https://httpd.apache.org/docs/2.4/
    Process: 928 ExecStart=/usr/sbin/apachectl start (code=exited, status=0/SUCCESS)
   Main PID: 933 (apache2)
      Tasks: 56 (limit: 2273)
     Memory: 11.2M
        CPU: 1.891s
     CGroup: /system.slice/apache2.service
             ├─933 /usr/sbin/apache2 -k start
             ├─934 /usr/sbin/apache2 -k start
             ├─935 /usr/sbin/apache2 -k start
             └─936 /usr/sbin/apache2 -k start
Step 3: Install AWStats
To install AWStats, you need to run the following command:
# apt install awstatsThis command will start the installation process. It will resolve dependencies, run a transaction check, and install the necessary packages.
To get GeoIP information install the following Perl packages:
# apt install libgeo-ip-perl libgeo-ipfree-perlStep 4: Configure AWStats
Once the installation routine is completed, edit the file awstats.conf as follows:
LogFile="/var/log/apache2/access.log"
LogFormat=1
SiteDomain="your-domain.com"
HostAliases=”www.your-domain.com your-domain.com”
DNSLookup=0
AllowFullYearView=3
LoadPlugin="tooltips"
Step 5: Configure Apache for AWStats
Open the Apache configuration file /etc/apache2/conf-available/awstats.conf :
# nano /etc/apache2/conf-available/awstats.confPaste the content as shown below:
Alias /awstatsclasses "/usr/share/awstats/lib/"
Alias /awstats-icon "/usr/share/awstats/icon/"
Alias /awstatscss "/usr/share/doc/awstats/examples/css"
ScriptAlias /awstats/ /usr/lib/cgi-bin/
Options +ExecCGI -MultiViews +SymLinksIfOwnerMatch
Save and exit the configuration file.
To enable this conf run the command:
# ln -s /etc/apache2/conf-available/awstats.conf /etc/apache2/conf-enabled/awstats.confThen enable the "cgi" module in Apache:
# /usr/sbin/a2enmod cgiTo implement the changes, restart Apache webserver:
# systemctl restart apache2To implement the changes, restart Apache webserver:
# systemctl restart apache2You can see how the installation is progressing by pointing your web browser to:
# http://your-domain.com/cgi-bin/awstats.pl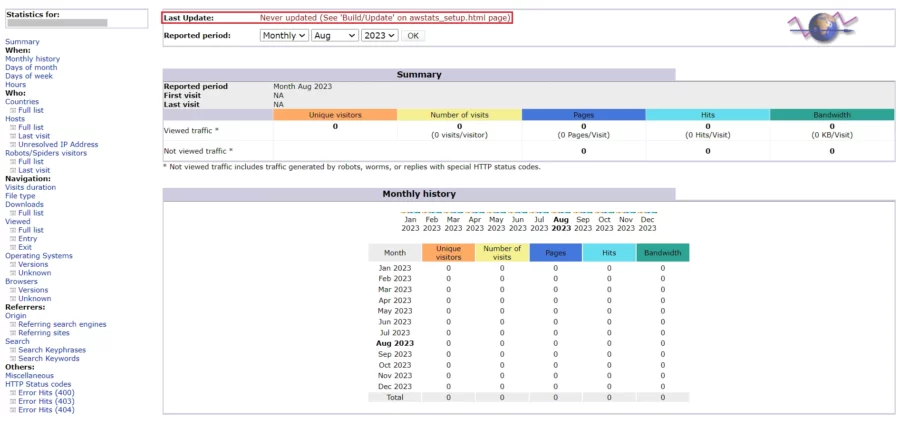
The top line displays the time when statistics were updated. It probably reads ‘Never updated’. It is all right, you just have to manually run the first update.
# /usr/lib/cgi-bin/awstats.pl -config=your-domain.com -updateAfter it is done, if it is successful, with no errors, you should get some output like:
Create/Update database for config "/etc/awstats/awstats.conf" by AWStats version 7.8 (build 20200416)
From data in log file "/var/log/apache2/access.log"...
Phase 1 : First bypass old records, searching new record...
Searching new records from beginning of log file...
Phase 2 : Now process new records (Flush history on disk after 20000 hosts)...
Jumped lines in file: 0
Parsed lines in file: 4258
 Found 0 dropped records,
 Found 0 comments,
 Found 0 blank records,
 Found 0 corrupted records,
 Found 0 old records,
 Found 4258 new qualified records.
Step 6: Secure Your AWStats via .htaccess
A basic, simple way of restricting access is to set up a http password. Open your apache2 configuration file
# nano /etc/apache2/sites-available/your-domain.com.confPaste the content as shown below:
<Directory /usr/lib/cgi-bin/>
    Options +ExecCGI
    AddHandler cgi-script .cgi
    AuthType Basic
    AuthName 'Password Protected Area'
    AuthUserFile '/usr/lib/cgi-bin/.htpasswd'
    Require valid-user
</Directory>
If you don’t have a password that can be used for this purpose, the command htpasswd can do it for you.
# htpasswd -cb /usr/lib/cgi-bin/.htpasswd admin Str0ngPassw0rdComments and Conclusion
Congratulations! You have successfully installed AWStats with Apache on your Debian 12 OS.
For additional help or useful information, we recommend you to check the official AWStats documentation.