
Nextcloud is a versatile and community-driven project, making it a popular choice for individuals, businesses, and organizations looking for a secure and self-hosted cloud storage and collaboration solution.
It is similar in functionality to popular cloud storage services like Dropbox, Google Drive, and Microsoft OneDrive but gives users greater control over their data and privacy because it can be deployed on their own servers or a cloud infrastructure of their choice.
In this tutorial, we will show you how to install Nextcloud on Debian 12 OS.
Step 1: Update Operating System
Update your Debian 12 operating system to make sure all existing packages are up to date:
# apt update && apt upgradeStep 2: Install Nginx webserver
You can install Nginx via apt package manager by executing the following command.
# apt install nginxYou can start the Nginx service and configure it to run on startup by entering the following commands:
# systemctl start nginx
# systemctl enable nginx
Verify the status of the Nginx service using systemctl status command:
# systemctl status nginxOutput:
● nginx.service - A high performance web server and a reverse proxy server
     Loaded: loaded (/lib/systemd/system/nginx.service; enabled; preset: enabled)
     Active: active (running)
       Docs: man:nginx(8)
    Process: 1280 ExecStartPre=/usr/sbin/nginx -t -q -g daemon on; master_process on; (code=exited, status=0/SUCCESS)
    Process: 1281 ExecStart=/usr/sbin/nginx -g daemon on; master_process on; (code=exited, status=0/SUCCESS)
   Main PID: 1304 (nginx)
      Tasks: 2 (limit: 2273)
     Memory: 1.7M
        CPU: 23ms
     CGroup: /system.slice/nginx.service
             ├─1304 "nginx: master process /usr/sbin/nginx -g daemon on; master_process on;"
             └─1307 "nginx: worker process"
Step 3: Install PHP and PHP extensions for Nextcloud
To install PHP and the necessary extensions, run the following command:
# apt install php php-cli php-fpm php-json php-common php-mysql php-zip php-gd php-intl php-curl php-xml php-mbstring php-bcmath php-gmpOnce the installation is complete verify if PHP is installed:
# php -vOutput:
PHP 8.2.7 (cli) (built: Jun 9 2023 19:37:27) (NTS)
Copyright (c) The PHP Group
Zend Engine v4.2.7, Copyright (c) Zend Technologies
with Zend OPcache v8.2.7, Copyright (c), by Zend TechnologiesAfter installing all the packages, edit the php.ini file:
# nano /etc/php/8.2/fpm/php.iniChange the following settings per your requirements:
max_execution_time = 300
memory_limit = 512M
post_max_size = 128M
upload_max_filesize = 128M
To implement the changes, restart the php-fpm service:
# systemctl restart php8.2-fpmStep 4: Install MariaDB database server
To install the MariaDB database server, run the following command:
# apt install mariadb-server mariadb-clientVerify the status of the MariaDB service using systemctl status command:
# systemctl status mariadbOutput:
● mariadb.service - MariaDB 10.11.3 database server
     Loaded: loaded (/lib/systemd/system/mariadb.service; enabled; preset: enabled)
     Active: active (running)
       Docs: man:mariadbd(8)
             https://mariadb.com/kb/en/library/systemd/
   Main PID: 14433 (mariadbd)
     Status: "Taking your SQL requests now..."
      Tasks: 11 (limit: 2273)
     Memory: 163.8M
        CPU: 513ms
     CGroup: /system.slice/mariadb.service
             └─14433 /usr/sbin/mariadbd
Once the installation is complete, run the following command to secure your MariaDB server:
# mysql_secure_installationConfigure it like this:
- Set root password? [Y/n] Y
- Remove anonymous users? [Y/n] Y
- Disallow root login remotely? [Y/n] Y
- Remove test database and access to it? [Y/n] Y
- Reload privilege tables now? [Y/n] Y
Restart the database server for the changes to take effect.
# systemctl restart mariadbStep 5: Create a New Database for Nextcloud
Once you have installed MariaDB, you’ll need to create a new database and user for Nextcloud to use.
To do this, log in to your MariaDB server using the following command:
# mysql -u root -pYou will be prompted to enter your root password. Once you have entered your password, you will be taken to the MariaDB prompt.
Run the following commands to create a new database and user:
MariaDB [(none)]> CREATE DATABASE nextcloud;
MariaDB [(none)]> GRANT ALL PRIVILEGES ON nextcloud.* TO 'nextcloud'@'localhost' IDENTIFIED BY 'Password';
MariaDB [(none)]> FLUSH PRIVILEGES;
MariaDB [(none)]> EXIT;
Note: Make sure to replace 'Password' with a strong password of your choice.
Step 6: Download and Install Nextcloud
You can download the latest version of Nextcloud from the Nextcloud Official site.
Use the following command to download the latest version of Nextcloud:
# wget https://download.nextcloud.com/server/releases/latest.zipExtract file into the folder /var/www/ with the following command:
# unzip latest.zip -d /var/www/Change ownership of the /var/www/nextcloud directory to www-data.
# chown -R www-data:www-data /var/www/nextcloudStep 7: Configure Nginx for Nextcloud
Run the commands below to create a new VirtualHost file called nextcloud in the /etc/nginx/conf.d/ directory.
# nano /etc/nginx/conf.d/nextcloud.confPaste the content as shown below:
server {
  listen 80;
  server_name your-domain.com www.your-domain.com;
  root /var/www/nextcloud;
  index index.php index.html;
  charset utf-8;
  location / {
    try_files $uri $uri/ /index.php?$args;
  }
  location ~ .php$ {
    fastcgi_pass unix:/var/run/php/php8.2-fpm.sock;
    fastcgi_index index.php;
    fastcgi_param SCRIPT_FILENAME $document_root$fastcgi_script_name;
    include fastcgi_params;
  }
}
Remember to replace your-domain.com with the domain name of your server.
Save and exit the configuration file.
To implement the changes, restart Nginx webserver:
# systemctl restart nginxStep 8: Install free Let’s Encrypt SSL certificate
First we need to install the Certbot client which is used to create Let’s Encrypt certificates:
# apt install certbot python3-certbot-nginxTo get the SSL certificate using the Certbot, type the command given below:
# certbot --nginx -d your-domain.com -d www.your-domain.comIf the SSL certificate is successfully obtained, certbot displays a message to show the configuration was successful:
IMPORTANT NOTES:
 - Congratulations! Your certificate and chain have been saved at:
   /etc/letsencrypt/live/your-domain.com/fullchain.pem
   Your key file has been saved at:
   /etc/letsencrypt/live/your-domain.com/privkey.pem
   Your cert will expire on 2023-12-03. To obtain a new or tweaked
   version of this certificate in the future, simply run certbot
   again. To non-interactively renew *all* of your certificates, run
   "certbot renew"
 - Your account credentials have been saved in your Certbot
   configuration directory at /etc/letsencrypt. You should make a
   secure backup of this folder now. This configuration directory will
   also contain certificates and private keys obtained by Certbot so
   making regular backups of this folder is ideal.
 - If you like Certbot, please consider supporting our work by:

   Donating to ISRG / Let's Encrypt:   https://letsencrypt.org/donate
   Donating to EFF:                    https://eff.org/donate-le
Now, you have successfully installed SSL on your website.
Step 9: Access Nextcloud Web Interface
Open your web browser and type the URL https://your-domain.com. You should see the Nextcloud installation page.
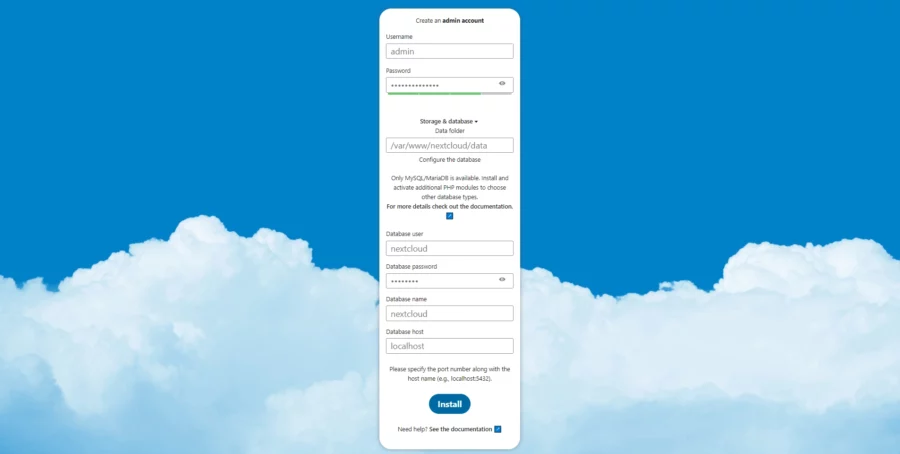
Click the Install button, you will see the Web interface of NextCloud.
Comments and Conclusion
That’s it. You have successfully installed NextCloud on Debian 12 OS.
For additional help or useful information, we recommend you to check the official Nextcloud documentation.
If you have any questions please leave a comment below.
when trying to get the certbot certificate i get this error
The nginx plugin is not working; there may be problems with your existing configuration.
The error was: NoInstallationError(“Could not find a usable ‘nginx’ binary. Ensure nginx exists, the binary is executable, and your PATH is set correctly.”)
nginx.service is running
i followed every step, redone them, same… i am not an expert at linux stuff, i just want a working nextcloud that is not completely crippled like the snap or the docker s….
the tutorial is probably missing a step, but what it is is beyond me, help please!
Your Nginx exists at /usr/sbin/nginx. You can create a symlink (symbolic) by using the ln command:
Then execute the command:
thanks, it works
on STEP 5: in the database
MariaDB [(none)]> GRANT ALL PRIVILEGES ON nextcloud.* TO ‘nextcloud’@’localhost’ IDENTIFIED BY ‘Password’;
What part of this line needs to be specific to my server?
Also if I didn’t change the ‘Password’ , (I’m stupid and just copied that line as is.) How do i fix it now? How do I change the password, and does the password need to be inside the single quote mark? It needs an example on this STEP 5.
“localhost” means that the MariaDB server is on the same server with your website.
You can change the password with the following command:
HAVING TROUBLE HERE. (Thank you for your help)
Deploying certificate
Could not install certificate
NEXT STEPS:
– The certificate was saved, but could not be installed (installer: nginx). After fixing the error shown below, try installing it again by running:
certbot install –cert-name MyDomainName.com
Could not automatically find a matching server block for MyDomainName.com. Set the `server_name` directive to use the Nginx installer.
Ask for help or search for solutions at https://community.letsencrypt.org. See the logfile /var/log/letsencrypt/letsencrypt.log or re-run Certbot with -v for more details.
Please check the Nginx configuration with the following command:
According to the message the Nginx installer doesn’t understand your Nginx configuration.
Please double-check a server_name:
You need to replace your-domain.com with a valid domain name pointed to your server.
This was the best tutorial I found. I’m a newbie and I managed to generate the certificate and open the Apache page. Unfortunately, it didn’t open the NextCloud page. I’ll check everything again. If anyone knows why Apache opens and not NextCloud, please let me know. Thanks.
I did it, I redid the steps in the tutorial and it worked. But I had to remove apache2. Now the nginx screen with nextcloud appeared. Thanks. Great tutorial.