
Magento is an open-source e-commerce platform that allows businesses to create and manage their online stores. It was first released in 2008 and has since become one of the most popular e-commerce platforms in the world.
Magento provides a range of features and tools that help businesses to customize their online store and manage their products, customers, and orders.
Some of the key features of Magento include a robust shopping cart system, customizable product pages, flexible pricing rules, integrated payment and shipping options, and a wide range of extensions and plugins that can be used to enhance the functionality of the platform.
Magento is also known for its scalability, which means it can be used by businesses of all sizes, from small startups to large enterprises.
In this tutorial we will show you how to install the Open Source version of Magento 2.4.6 on Ubuntu 22.04 OS.
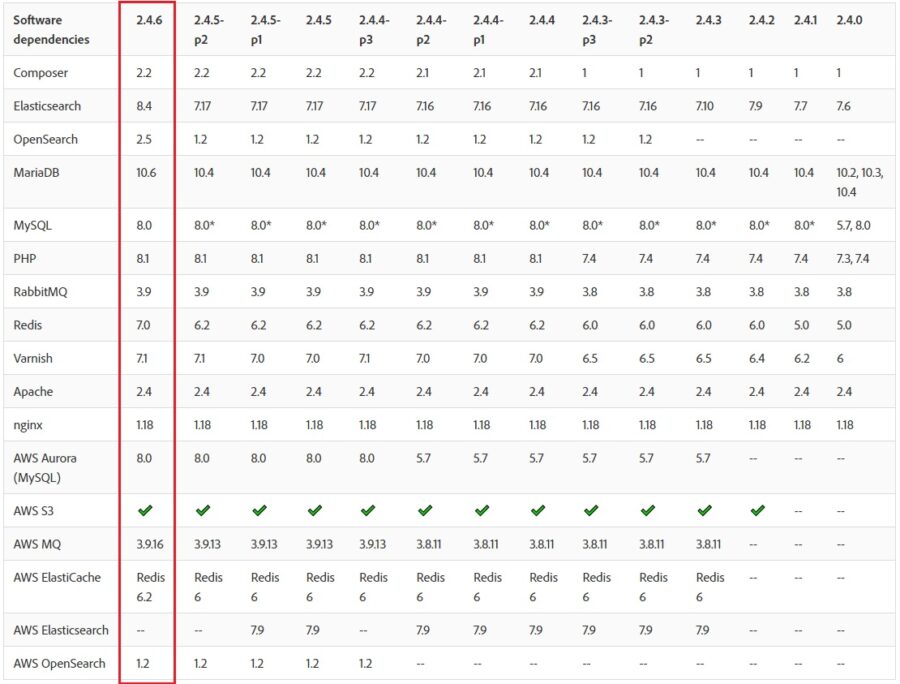
Before starting the installation, you can check the system requirement for installing Magento2:
Step 1: Update Operating System
Update your Ubuntu 22.04 operating system to make sure all existing packages are up to date:
# apt update && sudo apt upgrade -yStep 2: Install Nginx web server
To install Nginx web server, run the following command:
# apt install nginxOnce installed, Nginx should be running. If it’s not, for whatever reason, start it:
# systemctl start nginxThen enable it to start on boot time.
# systemctl enable nginxStep 3: Install PHP and PHP extensions
Magento 2.4.6 comes with support for the latest PHP 8.2, while PHP 8.1 remains fully supported. By default, PHP 8.1 is included in the Ubuntu 22.04 default repository.
You can install PHP 8.1 using the following command:
# apt-get install php php-dev php-fpm php-bcmath php-intl php-soap php-zip php-curl php-mbstring php-mysql php-gd php-xmlVerify if PHP is installed.
php -vOutput:
PHP 8.1.2-1ubuntu2.11 (cli) (built: Feb 22 2023 22:56:18) (NTS)
Copyright (c) The PHP Group
Zend Engine v4.1.2, Copyright (c) Zend Technologies
with Zend OPcache v8.1.2-1ubuntu2.11, Copyright (c), by Zend Technologies
Update php.ini file
Now it’s time to increase values in the php.ini file.
To locate the PHP configuration file run the following command:
# php --ini | grep "Loaded Configuration File"

Output:
Loaded Configuration File:         /etc/php/8.1/cli/php.ini
Open php.ini file:
# nano /etc/php/8.1/cli/php.ini
Change the following data:
file_uploads = On
allow_url_fopen = On
short_open_tag = On
memory_limit = 512M
upload_max_filesize = 128M
max_execution_time = 3600
Then save this php.ini file.
After that, you should restart nginx for the configuration to take effect:
# systemctl restart nginx
Step 4: Install MySQL 8 and create a database
You can install MySQL with the following command:
# apt install mysql-serverStart the database server daemon, and also enable it to start automatically at the next boot with the following commands:
# systemctl start mysql
# systemctl enable mysql
Once the database server is installed, log into the MySQL prompt:
# mysql -u root -pTo create a database, database user, and grant all privileges to the database user run the following commands:
mysql> CREATE DATABASE magentodb;
mysql> CREATE USER 'magentouser'@'localhost' IDENTIFIED BY 'MyPassword';
mysql> GRANT ALL ON magentodb.* TO 'magentouser'@'localhost';
mysql> FLUSH PRIVILEGES;
mysql> EXIT
Step 5: Installing Elasticsearch
Starting Magento 2.4, all installations must be configured to use Elasticsearch as the catalog search engine.
Import the Elasticsearch GPG key.
# wget -qO - https://artifacts.elastic.co/GPG-KEY-elasticsearch | sudo gpg --dearmor -o /usr/share/keyrings/elasticsearch-keyring.gpgAdd the Elasticsearch repository.
# echo "deb [signed-by=/usr/share/keyrings/elasticsearch-keyring.gpg] https://artifacts.elastic.co/packages/8.x/apt stable main" | sudo tee /etc/apt/sources.list.d/elastic-8.x.listUpdate the apt package manager and install Elasticsearch:
# apt update && apt install elasticsearchThen start and enable the service.
# systemctl start elasticsearch# systemctl enable elasticsearchNow open the elasticsearch.yml file
sudo nano /etc/elasticsearch/elasticsearch.ymland replace this setting with false:
# Enable security features
xpack.security.enabled: false
After that, you should restart elasticsearch service for the configuration to take effect:
# systemctl restart elasticsearch.serviceTo verify that Elasticsearch is running correctly, you will use the curl command:
# curl -X GET "localhost:9200/"If Elasticsearch is working properly, the result should be like this:
{
  "name" : "ubuntu",
  "cluster_name" : "elasticsearch",
  "cluster_uuid" : "KPbFKCVLT9uu-RFxzxH_Bw",
  "version" : {
    "number" : "8.6.2",
    "build_flavor" : "default",
    "build_type" : "deb",
    "build_hash" : "2d58d0f136141f03239816a4e360a8d17b6d8f29",
    "build_date" : "2023-02-13T09:35:20.314882762Z",
    "build_snapshot" : false,
    "lucene_version" : "9.4.2",
    "minimum_wire_compatibility_version" : "7.17.0",
    "minimum_index_compatibility_version" : "7.0.0"
  },
  "tagline" : "You Know, for Search"
}
Step 6: Install Composer
To download Composer, run the following command:
# curl -sS https://getcomposer.org/installer | phpNext, move the composer file to the /usr/local/bin path.
# mv composer.phar /usr/local/bin/composerAssign execute permission:
# chmod +x /usr/local/bin/composerVerify the Composer version installed:
# composer --version

Output:
Composer version 2.5.4 2023-02-15 13:10:06
Step 7: Install Magento 2.4.6
For most situation it is recommended to install Magento using the Marketplace by creating access key.
For generating Access keys go to:
My profile > Marketplace > My products > Access Keys
Run the following command to download Magento 2.4.6 data:
# composer create-project --repository-url=https://repo.magento.com/ magento/project-community-edition=2.4.6 /var/www/magento2Username : Your Public Key
Password : Your Private Key
Navigate to the Magento directory:
# cd /var/www/magento2Chmod cache and static content folder
find var generated vendor pub/static pub/media app/etc -type f -exec chmod g+w {} +Change the ownership of the Magento directory to the webserver user and also the permissions:
# chown -R www-data:www-data /var/www/magento2
# chmod -R 755 /var/www/magento2
Now, install Magento using the composer command, type:
# bin/magento setup:install \
--base-url=http://your-domain.com \
--db-host=localhost \
--db-name=magentodb \
--db-user=magentouser \
--db-password=MyPassword \
--admin-firstname=Admin \
--admin-lastname=User \
--admin-email=admin@your-domain.com \
--admin-user=admin \
--admin-password=admin123 \
--language=en_US \
--currency=USD \
--timezone=America/Chicago \
--use-rewrites=1
After the installation process you will see the admin link for your Magento site.
[SUCCESS]: Magento installation complete.
[SUCCESS]: Magento Admin URI: /admin_o07lew
Nothing to import.
Step 8: Configure Nginx Web Server for Magento 2.4.6
Navigate to /etc/nginx/conf.d directory and run the following command to create a configuration file for your Magento installation:
# nano /etc/nginx/conf.d/magento2.confAdd the following content:
upstream fastcgi_backend {
  server  unix:/run/php/php8.1-fpm.sock;
}

server {

  listen 80;
  server_name your-domain.com www.your-domain.com;
  set $MAGE_ROOT /var/www/magento2;
  include /var/www/magento2/nginx.conf.sample;
}
Save the file and Exit.
Restart the Nginx web server.
# systemctl restart nginxStep 9: Access your Magento 2.4.6 Application
Open your browser and type your domain e.g http://your-domain.com
Comments and Conclusion
That’s it. You have successfully installed Open Source version of Magento 2.4.6 on Ubuntu 22.04.
If you have any questions please leave a comment below.
Thanks for the tutorial. Most steps worked like a charm, although quite a few needed an added sudo to run properly.
Eventually I got it working, however, when I try to login to the admin area, it tells me that I need Two-Factor to login and an email was sent to me. Since there is no email details setup, I doubt the system will ever manage to send that email. How can I still get access to the admin area?
You can try to disable Two-Factor Authentication module for first time login using the following command:
Hi, I got this error when starting elasticserch:
$sudo service elasticsearch start
[sudo] password for user1:
Starting elasticsearch: Starts Elasticsearch
Option Description
—— ———–
-E Configure a setting
-V, –version Prints Elasticsearch version information and exits
-d, –daemonize Starts Elasticsearch in the background
–enrollment-token An existing enrollment token for securely joining a
cluster
-h, –help Show help
-p, –pidfile Creates a pid file in the specified path on start
-q, –quiet Turns off standard output/error streams logging in console
-s, –silent Show minimal output
-v, –verbose Show verbose output
ERROR: D is not a recognized option
failed.
Followed these instructions exactly. Ended with Apache2 and nginx conflicting for bind to port 80 TCP
Please make sure that you use Nginx web server instead of Apache
I am on Nginx, all good until installed Elasticsearch. The password gets refused, ssl cert is not trusted….
Hi
Magento is installed successfully and all command are running.
still showing 502 Bad Gateway
nginx/1.18.0 (Ubuntu)