
ConfigServer Security & Firewall (CSF) is an iptables-based firewall that provides high-level security to the Linux system.
CSF includes a wide range of features, such as IP blocking, port blocking, and DoS protection. It also supports advanced security measures, such as rate limiting, connection tracking, and SSH login detection. In addition to its firewall features, CSF includes tools for system and file integrity checking, as well as email and login tracking.
Step 1: Update Operating System
Update your AlmaLinux 9 operating system to make sure all existing packages are up to date:
# dnf updateAlso, install:
# dnf install wget nano tarStep 2: Disable firewalld and any other iptables firewall
Run the following command below to sto p and disable the firewalld service:
# systemctl stop firewalld
# systemctl disable firewalld
Step 3: Install Required Perl Modules for CSF
Install the following Perl modules required by CSF.
# dnf install perl-libwww-perl.noarch perl-LWP-Protocol-https.noarch perl-GDGraphIf some modules are not available in the default repository install the epel repository using the following command:
# dnf install epel-releaseThen try to install the modules again.
Step 4: Download CSF
By default, CSF is not available in the AlmaLinux standard repository, so you will need to download it from their official website.
# wget https://download.configserver.com/csf.tgzOnce downloaded, extract file with the following command:
# tar xzf csf.tgzChange the directory to the extracted directory:
# cd csfInstall the CSF by running the installation script:
# sh install.shThen you can check the iptables mode using below command.
# perl /usr/local/csf/bin/csftest.plYou should see the following output:
Testing ip_tables/iptable_filter…OK
Testing ipt_LOG…OK
Testing ipt_multiport/xt_multiport…OK
Testing ipt_REJECT…OK
Testing ipt_state/xt_state…OK
Testing ipt_limit/xt_limit…OK
Testing ipt_recent…OK
Testing xt_connlimit…OK
Testing ipt_owner/xt_owner…OK
Testing iptable_nat/ipt_REDIRECT…OK
Testing iptable_nat/ipt_DNAT…OK

RESULT: csf should function on this server
Step 5: Configuring the CSF
CSF runs in TEST mode by default. To disable it, you need to edit the /etc/csf/csf.conf file.
# nano /etc/csf/csf.confLocate the line TESTING = 1 and change the value to 0 or else LFD daemon fail to start.
TESTING = "0"Locate the line RESTRICT_SYSLOG = 0 and change its value to 3. This means only members of the RESTRICT_SYSLOG_GROUP can access the syslog/rsyslog files.
RESTRICT_SYSLOG = "3"Also, you can allow incoming and outgoing port as per your requirement:
# Allow incoming TCP ports
TCP_IN = "20,21,22,25,53,80,110,143,443,465,587,993,995"

# Allow outgoing TCP ports
TCP_OUT = "20,21,22,25,53,80,110,113,443,587,993,995"
Once your done all the configuration, restart and enable CSF:
# systemctl restart csf && systemctl restart lfd
# systemctl enable csf && systemctl enable lfd
# systemctl status csf && systemctl status lfd
Step 6: Enable CSF GUI
By default, it is disabled in the CSF default configuration file, so you will need to enable it first. For enabling CSF GUI you need to setup Integrated User Interface section in csf.conf configuration file.
Open the CSF main configuration file with the following command:
# nano /etc/csf/csf.confChange the following lines:
###############################################################################
# SECTION:Integrated User Interface
###############################################################################

# 1 to enable, 0 to disable web ui
UI = "1"

# Set port for web UI. The default port is 6666.
UI_PORT = "8888"

# Leave blank to bind to all IP addresses on the server
UI_IP = ""

# Set username for authetnication
UI_USER = "admin"

# Set a strong password for authetnication
UI_PASS = "Test@12345"
Next you need to allow the IP from where you are going to access CSF GUI. You can either allow the entire subnet or you can also choose to allow some specific IP Address like below.
# echo "YOUR_PUBLIC_IP_ADDRESS" >> /etc/csf/ui/ui.allowThen restart the CSF and LFD service to apply the changes.
# systemctl restart csf
# systemctl restart lfd
Step 7: Access CSF Web Interface
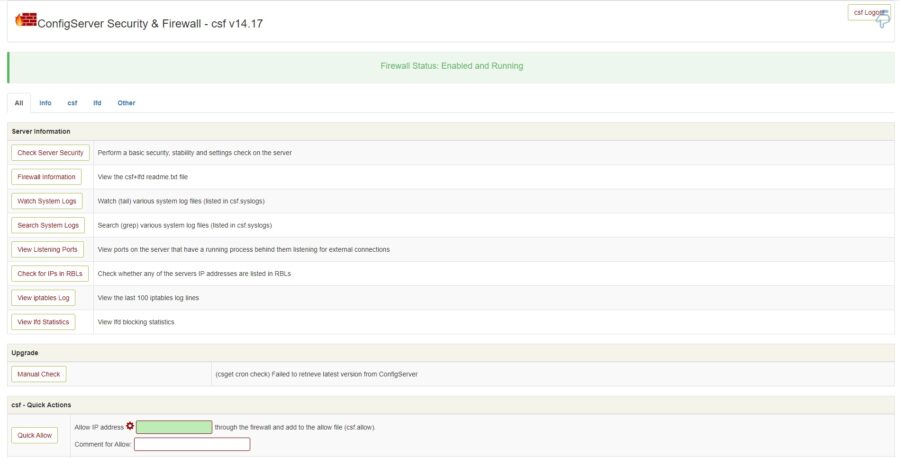
Open your web browser and type the URL https://your-server-IP:8888. You will be redirected to the CSF login page:

Provide your admin username and password and click on the Enter button. You should see the dashboard:
Step: 8: Manage CSF with Command Line
To list all firewall rules, run the following command:
# csf -lTo stop CSF, run the following command:
# csf -sTo allow a specific IP address, run the following command:
# csf -a IP-addressTo deny an IP address, run the following command:
# csf -d IP-addressTo remove blocked IP address from a CSF rule, run the following command:
# csf -dr IP-addressTo verify whether the IP address is blocked or not, run the following command:
# csf -g IP-addressTo flush the CSF firewall rules, run the following command:
# csf -fTo disable CSF, run the following command:
# csf -xStep 9: Uninstall CSF and LFD on AlmaLinux
Run the following script to remove CSF and LFD from your system.
# sh /etc/csf/uninstall.shList of Important CSF Configuration Files
Below are the important configuration files that control the most of the rules in the CSF.
csf.conf– the main configuration file, it has helpful comments explaining what each option doescsf.allow– a list of IP’s and CIDR addresses that should always be allowed through the firewallcsf.deny– a list of IP’s and CIDR addresses that should never be allowed through the firewallcsf.ignore– a list of IP’s and CIDR addresses that lfd should ignore and not not block if detectedcsf.*ignore– various ignore files that list files, users, IP’s that lfd should ignore. See each file for their specific purpose and tax
If you manually modify these files, you will need to restart csf and then lfd them to take effect.
Conclusion
Congratulations! You have successfully installed CSF Firewall. Thanks for using this tutorial for installing ConfigServer Security & Firewall (CSF) on your AlmaLinux 9 OS. For additional help or useful information, you can check the official CSF Firewall website.
don’t forget
csf -e
to enable csf.