
NextCloud provides reliable self-hosted cloud services and comes off as a good substitute for platforms such as Box and DropBox. It runs on your own server, protecting your data and giving you access from your desktop or mobile devices. You can synchronize everything between your devices and share files with others as well.
Update Operating System
Update your AlmaLinux 8 operating system to make sure all existing packages are up to date:
$ sudo dnf updateAlso, install:
$ sudo dnf install wget nano unzipInstall Apache web server
To install Apache web server, run the following command:
$ sudo dnf install httpdApache does not start automatically when it is installed, you need to start it:
$ sudo systemctl start httpdThen enable it to start on boot time.
$ sudo systemctl enable httpdInstall PHP 8.1 and required PHP modules
Currently, PHP 8.1 is not featured in AlmaLinux’s AppStream. However, you can install PHP from (Remi) repository, a free-to-use third-party repository that deploys the latest PHP 8.0 builds.
To install EPEL, use the following (dnf) terminal command:
$ sudo dnf install epel-releaseNow that you have added the EPEL repository, enable (Remi repository) with the following command:
$ sudo dnf install dnf-utils http://rpms.remirepo.net/enterprise/remi-release-8.rpmUse the (dnf) command to update your repository list:
$ sudo dnf updateNext, enable PHP 8.1 with the following command:
$ sudo dnf module enable php:remi-8.1Now that you have added the Remi PHP repository and enabled PHP 8.1 to be the default version on your system, you can install PHP 8.1 with the following command:
$ sudo dnf install phpFor NextCloud to seamlessly work some additional PHP modules are required, install them with the following command:
$ dnf install php-mysql php-fpm php-gd php-zip php-intl php-bcmath php-gmpIncrease PHP Memory limit:
$ sudo nano /etc/php.iniFind memory_limit and set the value to 512M
memory_limit = 512MInstall MariaDB and create a database
MariaDB 10.7 is the latest release version for this relational database system. To be able to install MariaDB 10.7 on AlmaLinux 8 you need to add the MariaDB YUM repository:
$ curl -LsS -O https://downloads.mariadb.com/MariaDB/mariadb_repo_setup
$ sudo bash mariadb_repo_setup --mariadb-server-version=10.7
Once the repository has been added to the system, installing MariaDB is an easy task that can be accomplished with the following command:
$ sudo dnf install MariaDB-server MariaDB-clientOnce the installation is complete, verify the installed version of MariaDB.
$ sudo systemctl status mariadbOutput:
● mariadb.service - MariaDB 10.7.1 database server
Loaded: loaded (/usr/lib/systemd/system/mariadb.service; enabled; vendor preset: disabled)
Drop-In: /etc/systemd/system/mariadb.service.d
└─migrated-from-my.cnf-settings.conf
Active: active (running)
Docs: man:mariadbd(8)
https://mariadb.com/kb/en/library/systemd/
Process: 1450 ExecStartPost=/bin/sh -c systemctl unset-environment _WSREP_START_POSITION (code=exited, status=0/SUCCESS)
Process: 1000 ExecStartPre=/bin/sh -c [ ! -e /usr/bin/galera_recovery ] && VAR= || VAR=`cd /usr/bin/..; /usr/bin/galera_recovery`; [ $? -eq 0 ] && systemctl set-environment _WSREP_START_POSITION=$VAR || exit 1 (code=exited, status>
Process: 987 ExecStartPre=/bin/sh -c systemctl unset-environment _WSREP_START_POSITION (code=exited, status=0/SUCCESS)
Main PID: 1017 (mariadbd)
Status: "Taking your SQL requests now..."
Tasks: 8 (limit: 11234)
Memory: 89.1M
CGroup: /system.slice/mariadb.service
└─1017 /usr/sbin/mariadbd
Start the database server daemon, and also enable it to start automatically at the next boot with the following commands:
$ sudo systemctl start mariadb
$ sudo systemctl enable mariadb
Once the database server is installed, log into the MariaDB prompt:
$ sudo mysql -u root -pTo create a database, database user, and grant all privileges to the database user run the following commands:
MariaDB [(none)]> CREATE DATABASE nextcloud_db;
MariaDB [(none)]> CREATE USER 'nextcloud_user'@'localhost' IDENTIFIED BY 'Passw0rd';
MariaDB [(none)]> GRANT ALL ON nextcloud_db.* TO 'nextcloud_user'@'localhost';
MariaDB [(none)]> FLUSH PRIVILEGES;
MariaDB [(none)]> EXIT
Installing NextCloud
Use the following command to download NextCloud 23:
$ sudo dnf -y install wget
$ sudo wget https://download.nextcloud.com/server/releases/nextcloud-23.0.2.zip
Extract file into the folder /var/www/ with the following command,
$ sudo dnf -y install unzip
$ sudo unzip nextcloud-23.0.2.zip -d /var/www/
Create a directory to store the user data,
$ sudo mkdir -p /var/www/nextcloud/dataEnable permission for the Apache webserver user to access the NextCloud files,
$ sudo chown -R apache:apache /var/www/nextcloud/Open port 80 on the webserver:
$ sudo firewall-cmd --add-port=80/tcp --zone=public --permanent

$ sudo firewall-cmd --reload
Configure Apache Web Server for NextCloud
Navigate to /etc/apache2/sites-available directory and run the following command to create a configuration file for your NextCloud installation:
$ sudo nano /etc/httpd/conf.d/nextcloud.confAdd the following content:
<VirtualHost *:80>

ServerName cloud.your-domain.com

ServerAdmin webmaster@your-domain.com
DocumentRoot /var/www/nextcloud

<Directory /var/www/nextcloud/>
Options +FollowSymlinks
AllowOverride All
Require all granted
</Directory>

ErrorLog /var/log/httpd/cloud.your-domain.com_error.log
CustomLog /var/log/httpd/cloud.your-domain.com_access.log combined

</VirtualHost>
Save the file and Exit.
Restart the Apache web server.
$ sudo systemctl restart httpdAccess your NextCloud Application
Open your browser and complete the final steps at http://cloud.your-domain.com
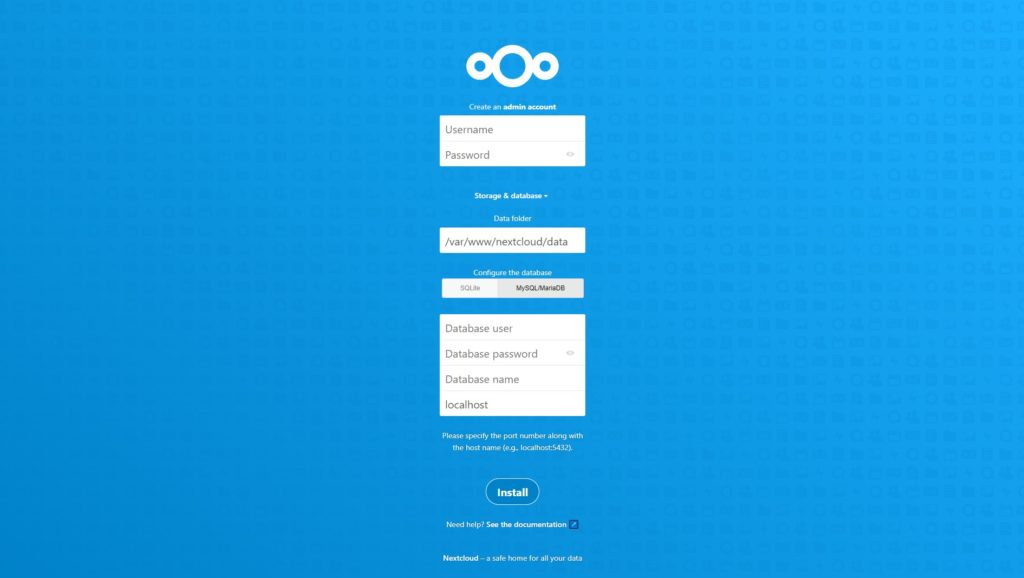
Click the Install button, you will see the Web interface of NextCloud.
Comments and Conclusion
That’s it. You have successfully installed NextCloud on AlmaLinux 8.
If you have any questions please leave a comment below.