
Python is one of the most popular programming languages in the world, widely used for web development, data science, automation, and DevOps. With every new release, Python introduces performance improvements, security patches, and modern syntax features that make development smoother and faster.
This tutorial illustrates two methods of how to install it on your Ubuntu 24.04 OS.
- Install Python 3.14 from the Deadsnakes PPA
- Manually build Python 3.14 from the source code
Why Upgrade to Python 3.14?
Before diving into the commands, it’s worth understanding why upgrading to Python 3.14 is beneficial.
Some of the expected improvements in Python 3.14 include:
- Performance boosts: Faster startup times and optimized memory usage.
- Enhanced syntax features: Cleaner pattern matching and new language constructs.
- Improved error messages: More readable and beginner-friendly tracebacks.
- Security updates: Stronger hashing algorithms and better sandboxing support.
Python 3.14 is fully backward compatible with most 3.x scripts, but testing your projects in a virtual environment is still recommended before full migration.
Update and Upgrade Your System
Start by updating your Ubuntu 24.04 system to avoid package conflicts:
# apt update && sudo apt upgrade -y
Method 1: Install Python 3.14 Using Deadsnakes PPA (Recommended)
This method makes it easy to install Python 3.14 on Ubuntu 24.04 and be able to receive continued updates, bug fixes, and security updates.
The Deadsnakes PPA is a trusted third-party repository that provides newer versions of Python for Ubuntu systems.
First Add the Deadsnakes PPA to the APT package manager sources list:
# add-apt-repository ppa:deadsnakes/ppa -yPress Enter to continue.
Once the repository has been installed, run an APT update to ensure that the newly imported PPA is reflected.
# apt update
Now you can install Python 3.14 with the following command:
# apt install python3.14 -y
Then verify the installation with the following command:
# python3.14 --version
You should see output similar to:
Python 3.14.0If you have installed Python 3.14 using the APT package manager, the PIP will not be installed by default. To install pip3.14, run the following command:
# curl -sS https://bootstrap.pypa.io/get-pip.py | python3.14 You can check PIP for the Python 3.14 version using the following command:
Method 2: Build Python 3.14 from Source
Also, you can compile Python 3.14 manually from the official source code. With this installation method, the main issue is that you cannot quickly update like the APT package manager and will need to recompile for any changes.
First, install the required prerequisite packages for the compilation of the Python 3.10 source code.
# apt install -y build-essential libssl-dev zlib1g-dev \
libncurses5-dev libncursesw5-dev libreadline-dev libsqlite3-dev \
libgdbm-dev libdb5.3-dev libbz2-dev libexpat1-dev liblzma-dev \
tk-dev libffi-dev uuid-dev wget
Now proceed and download the latest release version of Python from the Python official release page.
Alternatively, copy the download link for Python 3.14 gzipped tarball and use wget to pull it with the following command:
# cd /usr/src && wget https://www.python.org/ftp/python/3.14.0/Python-3.14.0.tgz
Once done, extract the archive:
# tar -xf Python-3.14.0.tgzNow navigate into the extracted directory and run the configure script to check the required dependencies.
# cd Python-3.14.0# ./configure --enable-optimizations --enable-sharedYou can speed up the build process by using all CPU cores:
make -j 6
Remember, the (-j) corresponds to the number of cores in your system to speed up the build time.
To find out how many cores you have on your system, execute the following code:
# nprocOutput:
6We have six cores, so in the (make) command, we used (-j 6).
Once the build process has been completed, run the following command to complete the Python installation. Instead of overwriting the system version, we’ll install Python 3.14 as an alternative:
# make altinstall
The altinstall target prevents replacing /usr/bin/python3 and keeps your default Python intact.
Verify your installation:
# python3.14 --version
If everything went smoothly, you’ll see:
Python 3.14.0Install Python Modules|Extensions
Modules and extensions can be installed using the Python Package manager (PIP).
Use the syntax below to install a Python module of choice.
# pip3.14 install module-nameIn this tutorial, We will show you how to install a Python module plotly.
# pip3.14 install plotlyOutput:
Collecting plotly
  Downloading plotly-6.4.0-py3-none-any.whl.metadata (8.5 kB)
Collecting narwhals>=1.15.1 (from plotly)
  Downloading narwhals-2.10.2-py3-none-any.whl.metadata (11 kB)
Requirement already satisfied: packaging in /usr/lib/python3/dist-packages (from plotly) (24.0)
Downloading plotly-6.4.0-py3-none-any.whl (9.9 MB)
   ━━━━━━━━━━━━━━━━━━━━━━━━━━━━━━━━━━━━━━━━ 9.9/9.9 MB 11.3 MB/s  0:00:00
Downloading narwhals-2.10.2-py3-none-any.whl (419 kB)
Installing collected packages: narwhals, plotly
Successfully installed narwhals-2.10.2 plotly-6.4.0
You can verify your module installation using the following command:
# pip3.14 list | grep plotly
Package                Version
---------------------- --------------------
..............
plotly 6.4.0
..............
Create a Virtual Environment
After successfully installing Python 3.14, it’s a best practice to create a virtual environment before installing any packages. Virtual environments allow you to isolate dependencies for each project preventing conflicts between system-wide and project-specific Python libraries.
The venv module is not included by default with the Python 3.14 installation, but you can install it manually:
# apt install python3.14-venv -y
This package provides the necessary tools to create and manage virtual environments.
You can create a virtual environment in your project directory. Navigate to your desired location and run:
# python3.14 -m venv myenv
Note: myenv is the name of your virtual environment (you can rename it).
To start using your isolated Python environment, activate it with the following command:
# source myenv/bin/activate
Once activated, your shell prompt should change to show the environment name, similar like this:
(myenv) root@linuxtuto:~#To deactivate the virtual environment run the following command:
# deactivateWhile the environment is active:
-
- All installed Python packages will stay local to the project.
-
- The global Python installation remains unaffected.
Optional: Set Python 3.14 as Default
Ubuntu 24.04 still ships with Python 3.12 by default. You can switch to Python 3.14 using update-alternatives safely:
# update-alternatives --install /usr/bin/python3 python3 /usr/bin/python3.12 1
# update-alternatives --install /usr/bin/python3 python3 /usr/bin/python3.14 2
# update-alternatives --config python3
And choose which one to use as Python3 via command:
# update-alternatives --config python3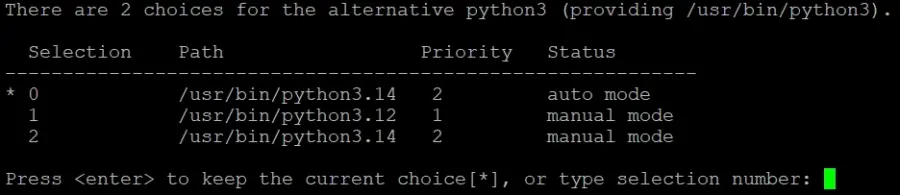
Select Python 3.14 when prompted, then verify:
# python3 --version
Expected output:
Python 3.14.0Conclusion
Installing Python 3.14 on Ubuntu 24.04 is simple using the Deadsnakes PPA or by compiling from source. The new release delivers performance improvements, better syntax, and modern features that make development faster and safer.
With Python 3.14 installed, you’re ready to build powerful applications, automate workflows, or explore AI projects with the latest language tools.
For additional help or useful information, we recommend you to check the official Python documentation.