
Magento is an open-source e-commerce platform that provides online merchants with a flexible shopping cart system, as well as control over the look, content, and functionality of their online stores. It also has a large community of developers and users who contribute to its ongoing development and provide support through forums, documentation, and other resources.
Magento comes in two main editions: Magento Open Source (formerly known as Magento Community Edition) and Magento Commerce (formerly known as Magento Enterprise Edition). The Open Source edition is free to use and provides basic e-commerce functionality, while the Commerce edition is a paid version that includes more advanced features such as customer segmentation, targeted promotions, and advanced marketing tools.
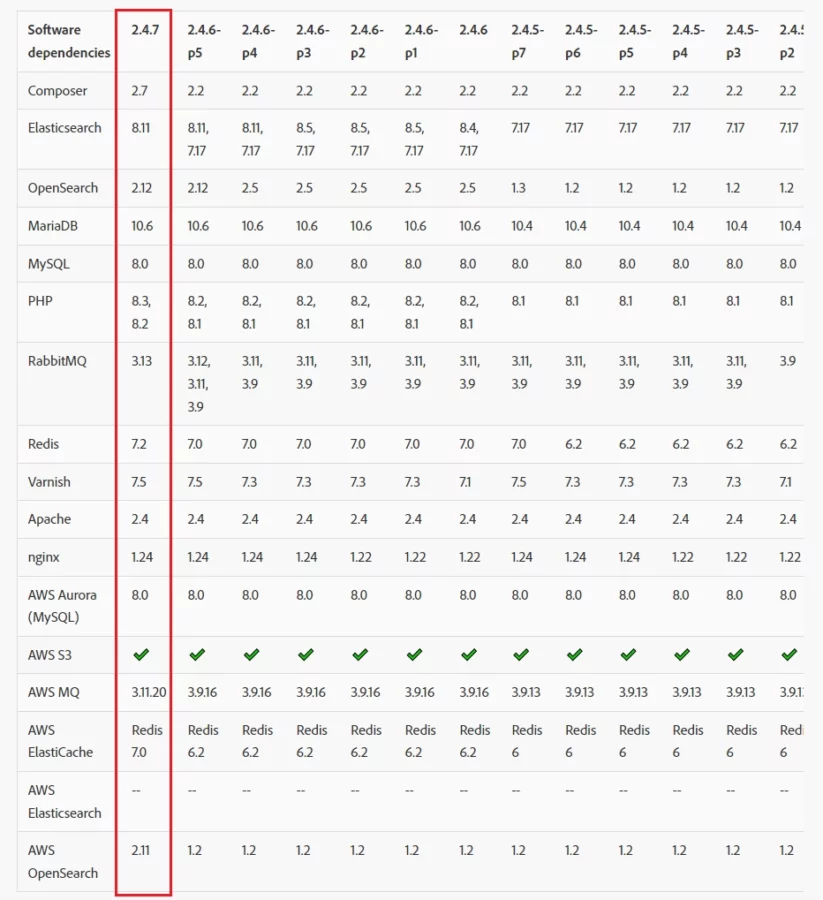
In this tutorial we will show you how to install the Open Source version of Magento 2.4.7 on Ubuntu 24.04 OS.
Before starting the installation, you can check the system requirement for installing Magento 2.4.7.
Step 1: Update Operating System
Update your Ubuntu 24.04 operating system to make sure all existing packages are up to date:
# apt update && apt upgradeStep 2: Install Apache web server
To install Apache web server, run the following command:
# apt install apache2You can start the Apache service and configure it to run on startup by entering the following commands:
# systemctl start apache2
# systemctl enable apache2
Verify the status of the Apache service using systemctl status command:
# systemctl status apache2Output:
● apache2.service - The Apache HTTP Server
     Loaded: loaded (/usr/lib/systemd/system/apache2.service; enabled; preset: enabled)
     Active: active (running)
       Docs: https://httpd.apache.org/docs/2.4/
   Main PID: 22413 (apache2)
      Tasks: 6 (limit: 2130)
     Memory: 16.8M (peak: 17.0M)
        CPU: 658ms
     CGroup: /system.slice/apache2.service
             ├─22413 /usr/sbin/apache2 -k start
             ├─22468 /usr/sbin/apache2 -k start
             ├─22469 /usr/sbin/apache2 -k start
             ├─22470 /usr/sbin/apache2 -k start
Step 3: Install PHP and PHP extensions
Magento 2.4.7 comes with support for the latest PHP 8.3, while PHP 8.2 remains fully supported. By default, PHP 8.3 is included in the Ubuntu 24.04 default repository.
You can install PHP 8.3 and required PHP extensions using the following command:
# apt install php php-exif php-bz2 php-bcmath php-intl php-soap php-zip php-curl php-mbstring php-mysql php-gd php-xmlVerify if PHP is installed.
php -vOutput:
PHP 8.3.0-1ubuntu1 (cli) (built: Jan 19 2024 14:00:34) (NTS)
Copyright (c) The PHP Group
Zend Engine v4.3.0, Copyright (c) Zend Technologies
with Zend OPcache v8.3.0-1ubuntu1, Copyright (c), by Zend Technologies
Update php.ini file
Now it’s time to increase values in the php.ini file.
Open php.ini file:
# nano /etc/php/8.3/apache2/php.ini
Change the following data:
short_open_tag = On
memory_limit = 512M
upload_max_filesize = 128M
max_execution_time = 3600
Then save this php.ini file.
After that, you should restart the Apache web server for the configuration to take effect:
# systemctl restart apache2
Step 4: Install MySQL and create a database
You can install the MySQL server with the following command:
# apt install mysql-serverVerify the status of the MySQL service using systemctl status command:
# systemctl status mysqlOutput:
● mysql.service - MySQL Community Server
     Loaded: loaded (/usr/lib/systemd/system/mysql.service; enabled; preset: enabled)
     Active: active (running)
    Process: 2907 ExecStartPre=/usr/share/mysql/mysql-systemd-start pre (code=exited, status=0/SUCCESS)
   Main PID: 2919 (mysqld)
     Status: "Server is operational"
      Tasks: 37 (limit: 2130)
     Memory: 362.8M (peak: 379.2M)
        CPU: 1.737s
     CGroup: /system.slice/mysql.service
             └─2919 /usr/sbin/mysqld
By default, MySQL is not hardened. You can secure MySQL using the mysql_secure_installation script:
# mysql_secure_installationConfigure it like this:
- Set root password? [Y/n] Y
- Remove anonymous users? [Y/n] Y
- Disallow root login remotely? [Y/n] Y
- Remove test database and access to it? [Y/n] Y
- Reload privilege tables now? [Y/n] Y
Now run the command below to log in to the MySQL shell.
# mysql -u root -pOnce you are logged in to your database server to create a database, database user, and grant all privileges to the database user run the following commands:
mysql> CREATE DATABASE magentodb;
mysql> CREATE USER 'magentouser'@'localhost' IDENTIFIED BY 'Str0ngPa$$w0rd';
mysql> GRANT ALL ON magentodb.* TO 'magentouser'@'localhost';
mysql> FLUSH PRIVILEGES;
mysql> EXIT
Step 5: Installing Elasticsearch
Starting Magento 2.4, all installations must be configured to use Elasticsearch as the catalog search engine.
Import the Elasticsearch GPG key:
# wget -qO - https://artifacts.elastic.co/GPG-KEY-elasticsearch | sudo gpg --dearmor -o /usr/share/keyrings/elasticsearch-keyring.gpgAdd the Elasticsearch repository:
# echo "deb [signed-by=/usr/share/keyrings/elasticsearch-keyring.gpg] https://artifacts.elastic.co/packages/8.x/apt stable main" | sudo tee /etc/apt/sources.list.d/elastic-8.x.listUpdate the apt package manager and install Elasticsearch:
# apt update && apt install elasticsearchThen start and enable the service:
# systemctl start elasticsearch
# systemctl enable elasticsearch
Open the elasticsearch.yml file:
# nano /etc/elasticsearch/elasticsearch.ymlThen uncomment the lines and update the values:
node.name: "ubuntu"
cluster.name: magento 2.4.7
network.host: 127.0.0.1
http.port: 9200
xpack.security.enabled: false
After that, you should restart elasticsearch service for the configuration to take effect:
# systemctl restart elasticsearchTo verify that Elasticsearch is running correctly, you will use the curl command:
# curl -X GET "localhost:9200/"If Elasticsearch is working properly, the result should be like this:
{
  "name" : "ubuntu",
  "cluster_name" : "magento 2.4.7",
  "cluster_uuid" : "nKzTibHRT_ahq6lCsWk6Ew",
  "version" : {
    "number" : "8.13.1",
    "build_flavor" : "default",
    "build_type" : "deb",
    "build_hash" : "9287f29bba5e270bd51d557b8daccb7d118ba247",
    "build_date" : "2024-03-29T10:05:29.787251984Z",
    "build_snapshot" : false,
    "lucene_version" : "9.10.0",
    "minimum_wire_compatibility_version" : "7.17.0",
    "minimum_index_compatibility_version" : "7.0.0"
  },
  "tagline" : "You Know, for Search"
}
Step 6: Install Composer
To download Composer, run the following command:
# curl -sS https://getcomposer.org/installer | phpNext, move the composer file to the /usr/local/bin path:
# mv composer.phar  /usr/local/bin/composer
# chmod +x   /usr/local/bin/composer
Verify the Composer version installed:
# composer --version

Output:
Composer version 2.7.2 2024-03-11 17:12:18
Step 7: Install Magento 2.4.7
For most situation it is recommended to install Magento using the Marketplace by creating access key.
To get the access keys, you should create an account in the Magento marketplace.
Then for generating access keys go to:
My profile > Marketplace > My products > Access Keys
Once access keys are generated run the following command to download Magento 2.4.7:
# composer create-project --repository-url=https://repo.magento.com/ magento/project-community-edition=2.4.7 /var/www/magento2Username : Your Public Key
Password : Your Private Key
Navigate to the Magento directory:
# cd /var/www/magento2Chmod cache and static content folder:
# find var generated vendor pub/static pub/media app/etc -type f -exec chmod g+w {} +Change the ownership of the magento2 directory to the webserver user and also the permissions:
# chown -R www-data:www-data /var/www/magento2
# chmod -R 755 /var/www/magento2
Now, install Magento using the composer command, type:
# bin/magento setup:install \
--base-url=http://your-domain.com \
--db-host=localhost \
--db-name=magentodb \
--db-user=magentouser \
--db-password='Str0ngPa$$w0rd' \
--admin-firstname=Admin \
--admin-lastname=User \
--admin-email=admin@your-domain.com \
--admin-user=admin \
--admin-password=admin123 \
--language=en_US \
--currency=USD \
--timezone=America/Chicago \
--use-rewrites=1
After the installation process you will see the admin link for your Magento site.
[SUCCESS]: Magento installation complete.
[SUCCESS]: Magento Admin URI: /admin_nuqh2y
Nothing to import.
Step 8: Configure Apache for Magento 2.4.7
Run the command below to create a new VirtualHost file in the /etc/apache2/sites-available/ directory:
# nano /etc/apache2/sites-available/magento2.confPaste the content as shown below:
 <VirtualHost *:80>
    ServerAdmin admin@your-domain.com
    DocumentRoot /var/www/magento2/pub

    ServerName your-domain.com
    ServerAlias www.your-domain.com

    <Directory /var/www/magento2/>
        AllowOverride All
    </Directory>

    ErrorLog /var/log/apache2/your-domain.com-error_log
    CustomLog /var/log/apache2/your-domain.com-access_log common

 </VirtualHost>
Remember to replace your-domain.com with the domain name of your server.
Save and exit the configuration file.
Next run the following command to enable rewrite module:
# a2enmod rewriteTo enable this site run the command:
# a2ensite magento2.confTo implement the changes, restart Apache webserver:
# systemctl restart apache2Step 9: Access your Magento 2.4.7 Application
Open your browser and type your domain http://your-domain.com
Comments and Conclusion
That’s it. You have successfully installed Open Source version of Magento 2.4.7 on Ubuntu 24.04.
For additional help or useful information, we recommend you to check the official Magento documentation.
If you have any questions please leave a comment below.
In Elasticsearch configuration I think the use of this syntax
node.name: “ubuntu”
instead of
node.name: ubuntu
caused an error when I tried to restart it (ES version = 8.17.1)
sudo systemctl restart elasticsearch
Job for elasticsearch.service failed because the control process exited with error code.
See “systemctl status elasticsearch.service” and “journalctl -xeu elasticsearch.service” for details.
node.name: “ubuntu”
cluster.name: magento 2.4.7
network.host: 127.0.0.1
http.port: 9200
xpack.security.enabled: false